Monday, May 16th
AIM: What is the meaning of transforamtion?
DO NOW: Try to define transformation. What does it mean to transform? Is there a point in your life in which you feel you transformed? What you think are some things that can cause a transformation?
Today's Activities:
Transformation can mean so many different things in so many different ways. In life we go through multiple transformations, some larege and some small. In movies, novels, storeis and art transformation is a common theme. Take any superhero movie for example. Peter Parker was bit by a spider and transformed into spiderman. Bruce Wayne lost his parents and slowly tranformed into Batman. Wether it is physical or emotional, trnaforamtion is a huge aprt of our lives.
For our final project we are going to work with the theme of tranformation in a self portrait. Often when people thing of self portraits they think of a realisitc version of themselves. Our self portraits will be done using drawing and collage as a means to break down reality and focus on our own personal understanding of the theme.
Tuesda, April 12th
AIM: How can we explore Asian Art and culture through waterolor?
DO NOW:Now that you have chosen your theme you should begin thinking about how you want to construct your lantern. Each side should relate to the other so today you should begin your first sketch for your first panel.
Monday, April 11th
AIM: How can we explore Asian Art and culture through waterolor?
DO NOW:Today we will be beginning our watercolor project. Before we begin please look at the following images.
http://www.flickr.com/photos/maistora/1398176835/
http://www.flickr.com/photos/nimmue/3287888723/
http://www.flickr.com/photos/rosehavencottage/3030624405/
http://www.flickr.com/photos/geoftheref/419311654/in/photostream/
Today's Activities:
Paper Lanterns in Asian Culture:
Often associated with festivals, paper lanterns are common in China and Japan, and similarly, in Chinatowns, where they are often hung outside of businesses to attract attention. In Japan the traditional styles include bonbori and chochin and there is a special style of lettering called chochin moji used to write on them.
Airborne paper lanterns are called sky lanterns, and are often released into the night sky for aesthetic effect at lantern festivals.
In China, paper lanterns can be classified into 5 distinct classes; the Baby's Bottom is the miniature class, often used in modern times with Christmas lights. The second class is the Rolling Paper, the tall, cylindrical lanterns often associated with restaurants and bars. The third class is the Tomato Light also known as Big Red; the classic round mid-size lantern. The fourth class is the Crystal Magic; the variously-shaped geometric lamps constructed of many square and triangular panes. The last is known as Buddha's Gastronomy; the large and extra large lanterns used to decorate temples and for show at festivals.[citation needed]
Red paper lanterns were once associated with brothels, and this is reflected in the term red light district. In Japan, red lanterns are often used as advertisements hung just outside bars and restaurants.
Next, there is Hawaiian Lantern Floating:
"Every Memorial Day thousands of people gather at Ala Moana Beach Park for the Lantern Floating Ceremony led by Her Holiness Keishu Shinso, the spiritual head of Shinnyo-en. The ceremony remembers those who gave their lives in conflict, allows for reflection on the memories of loved ones and dedicates prayers for a peaceful and harmonious future. Just as the waters of the Pacific merge with each ocean, the wish for peace and happiness extends from Hawaii across the globe."
"Lantern floating is an Asian spiritual tradition that beautifully symbolizes the wish for all beings to live in peaceful coexistence. As the lanterns are released onto the ocean they take with them our healing prayers for victims of conflict, famine, disaster and disease as well as our hopes for the happiness of all? past, present and future." [1]
"Lantern floating is [also] a time-honored Buddhist rite originating in Japan and conducted in order to pay respects to our ancestors and comfort the spirits of the deceased. During this Toro-Nagashi, or “lantern offerings on the water,” candle-lit lanterns are individually set afloat on the ocean and are said to ferry spirits ‘from the shore of delusion to the shore of salvation.’” [2]
http://www.lanternfloatinghawaii.com/
After seeing these images I want you to think for a minute about the recent events in Japan. Can you imagine living through that kind of a disaster?

Now let's talk about what we are going to do.
http://www.princetonol.com/groups/iad/lessons/high/anderson.html
Homework - you need to have your theme picked out and ready to go.
Friday, April 8th
AIM: MIDTERM?
DO NOW:Yes MIDTERM.
Let's go.
Thursday, April 7th
AIM: What do we need to know to be prepared for our midterm?
DO NOW: Please make sure you have a pencil ready and your sketchbooks. In a minute I will hand out your midterm review sheet. Take 15 minutes and try to complete this to the best of your ability. We will go over it together as a class afterwards.
Today's Activities:
You will need to hand in this midterm review sheet completed tomorrow with your exam. If you do this I will give you 5 extra points on your exam.
Wednesday, April 6th
AIM: How can we copy images accuratly using watercolor?
DO NOW: Set up your area. Make sure you have a cup of water, a few brushes and a watercolor set. Also make sure you have napkins or paper towels.
Today you should pick up where you left off. We do not have a lot of time so please stay focused and think about how you can make this piece as interesting as possible. Use your mistakes to your advantage.
Tuesday, April 5th
AIM: How can we copy images accuratly using watercolor?
DO NOW: Set up your area. Make sure you have a cup of water, a few brushes and a watercolor set. Also make sure you have napkins or paper towels.
Today's Activities:
Today you should pick up where you left off. Take a look at what you have completed so far. Now that you have areas that have dried you shoudl think about layering. Are the details you could add by adding wet in dry?
Monday, April 4th
AIM: Why is it important to understand the properties of different kinds of paint?
DO NOW: What have you noticed about watecolor that is different from Acrylic or tempera paint? It is important when we are using a specific material, that we understand how to use it well. Watercolor is designed for layering and unless we practice with this tecnique we will never master the medium. Materials managers, please get all the necessary supplies so that you can be prepared to paint.
Today's Activities: Today we are going to focus on layering. Before we begin I want you to take a minute and watch this video deonstrating different techniques using watercolor, including the process of layering.
http://www.youtube.com/watch?v=P6TINfM_kKw
Layering works differently with wet in dry vs wet in we. Please be aware of these difference as you are practicing.
I'm going to hand out an image of a flower to each of you. You are going to copy this flower to the best of your ability. Befor you start I want you take your pencil and LIGHTLY sketch out the different shapes that you are going to paint in. This sketch shoud be very light becasue you do no want it to show up through your painting.
Once this is complete you may start painting, but please keep the following in mind.
If you are going to start with a wash make sure that you leave the areas white that need to be white. You should also remember to start with the lightest color first and than layer and build onto that.
Thursday, March 31st
AIM: What is watercolor and how does it work?
DO NOW: Today we are going to continue with watercolor techniques. Before we continue however, lets refresh our memories in relation to color. In your sketchbooks I want you to answer the following questions.
Please write down the compliments to the following colors:
RED
BLUE
YELLOW
What happens when you put these two colors side by side?
What happens when you mix, or layer these two colors?
On the notcard that I have handed out I want you to draw 3 sets of 2 squares side by side. So basically I want you to have one square with red and the square next to it green. The other set Orange and the square next to it blue. The last set yellow and the square next to it purple. Once this is done set it aside and we will revisit this after it dries.
Now: Let's practice the following techniques:
Wet in Wet
Wet in wet is simply the process of applying pigment to wet paper. The results vary from soft undefined shapes to slightly blurred marks, depending on how wet the paper is. The wet in wet technique can be applied over existing washes provided the are thoroughly dry. Simply wet the paper with a large brush and paint into the dampness. The soft marks made by painting wet in wet are great for subtle background regions of your painting.
Dry Brush
Dry brush is the almost the opposite watercolor technique to wet in wet. Here a brush loaded with pigment (and not too much water) is dragged over completely dry paper. The marks produced by this technique are very crisp and hard edged. They will tend to come forward in your painting and so are best applied around the centre of interest
Lifting Off
Most watercolor pigment can be dissolved and lifted off after it has dried. Staining colors such as Phthalo or Prussian Blue, Alizarin, Windsor Red, Yellow or Blue are difficult to remove and are best avoided for this technique. The process for lifting off is simple - wet the area to be removed with a brush and clean water then blot the pigment away with a tissue. Using strips of paper to mask areas of pigment will produce interesting hard edged lines and shapes
Dropping in Color
This technique is simply the process of introducing a color to a wet region of the painting and allowing it to blend bleed and feather without interruption. The result is sometimes unpredictable but yields interesting and vibrant color gradations that cant be achieved by mixing the pigment on the palette.
WEDNESDAY, March 30th
AIM: What is watercolor and how does it work?
DO NOW: Today we are going to practice using watercolor and understanding watercolor technique. In front of you, you should each see a small piece of watercolor paper. Take a minute and touch this paper. Try to feel the difference in texture on both sides. What do you notice about this paper in comparison to regular drawing paper? Is it heaver or lighter? Why do you think you need to use paper like this when you are using watercolor?
Today's Activities:
1. Today we are going to talk about the different techniques that are used with watercolor. We are going to experiment with each of these techinqus together.
First - On your table you should have a watercolor set, water and brushes. Take a look at the brushes that you have available. Note that the shape of the brushes are defferent. Different brush shapes will obviously make different brush strokes. Let's take a minute and experiement with this. First pick a brush and dip it into the water. Now find the blue that is in you palatte. Get a little bit of blue and then draw a line on your paper. Look at the way the paper absorbs the color. Look at the shape of the line.
When using watercolor the shade of the color you use depends on how much water you mix with it. Try using more blue with less water. See what happens. Now try using more water and less blue and look at the difference.
Techniques we will review:
Step 1: Place your board at a 30-degree angle so that the brushstrokes you're going to put down will flow into each other. You're going to work from top to bottom. Load your brush with plenty of paint. Starting at the top edge of the piece of paper, put down a broad horizontal stroke, from one side to the other as if you were drawing a line with a pencil. Don't lift your brush until you're all the way across. Some paint will accumulate at the bottom of this stripe. Don't try to get rid of this, it's an essential part of a wash.
Step 2: Add some more paint to your brush, then make another horizontal stroke making sure that the tip of your brush picks up the "river" of paint at the bottom of the first stripe. Don't paint above this river or you'll ruin the evenness of your wash. Work quickly as you need to lay the next stroke before the river dries up, otherwise you'll end up with lines in your wash, and before it runs down the paper
Step 3: Continue in this way until you get to the bottom of the paper. Squeeze the excess paint from your brush between a fold of cloth, then use the brush tip to lift the excess paint from the last stroke. Don't worry if this makes the last stroke seem a little lighter than the rest, some of the paint will seep down while it dries and sort this out. Leave your board at an angle until the wash is completely dry, otherwise some of the wet paint will flow back up and your wash will dry unevenly.
Friday, March 18th
AIM: What do we need to know about color in order to make good decisions in our work?
DO NOW: Look at the colors you have used so far in your composition. Are they communicating your theme? Why or why not?
Thursday, March 17th
AIM: What do we need to know about color in order to make good decisions in our work?
DO NOW:Different colors can often inspire different moods and emotions. Take a few minutes and write down the color that you associate with the following emotions:
Anger, Jealousy, Love, Fear, Violence, Sorrow, Happiness, Regret, Compassion, Relaxation.
Today's Activities:
Today we will discuss primary, complimentary and analagous colors briefly. You should be able to state what they are and be aware of the impact that certain color combinations will have on your work.
Wednesday, March 16th
AIM: How can pattern change our composition?
DO NOW: Today you should be thinking about how the patterns and designs that you use will affect and change your piece. What kind of patterns, designs, images and symbols do you want to use and why? How do they reflect your theme?
Tuesday, March 15th
AIM: How can our knowledge of balance help us make decisions in our composition?
DO NOW: As we have discussed there are 4 types or balance that we have to consider in art. Symmetrical, assymetrical, radial and approximate. What type of balane have you decided to use? Please take a minute and write down which one best fits your work and why you have chosen to balance your compsoition is this way.
Today's Activities:
Today you should be thinking about how your composition is balanced. Even if you didn't realize it while you were drawing, you were making decisions that affect the balance. Try to think about what things would look like if you rearranged them. Is the way you have chosen to balance thing reflective of your theme or not?
It is important when we are in the midst of a project to make sure all the decisions we make are deliberate. Your work is yours and you should put as much thought into it as you can. That is what will make your artwork unique and stand out from the rest.
Monday, March 14th
AIM: How can we understand composition?
DO NOW: If you have not started on your final project paper you need to make sure that you acomplish that today. Before you begin please take a minute and write the definition of composition in your sketchbook. Now take a look at the work you have done so far. What do you think of your composition? How are you choosing to arrange your figures and why? What makes your composition interesting and unique?
Today's Activities:
Today we will continue to work on our final projects. After considering different ideas about composition I want you to think again about your theme. How does your composition realte to your theme? For example, if your theme is isolation, how can the arrangement of you figures help to convey this idea?
Every deceision that you make in your work should be intentional. Try to put as much effort as you can into making this artwork as interesting and well thought out as possible
Tuesday, March 8th
AIM: What is pattern?
DO NOW: In your sketchbooks I want you to take a minute and draw me an example of a pattern. What must you consider when creating a pattern? What makes a pattern a pattern?
Today's Activities:
Yesterday we tried drawing a figure froma magazine. This is something that you can do if you want to. Today however we are going to continue drawing from life, this time for even longer. The goal is for you to end up with four different figures that you can use in your project. Tomorrow you will get handout that outlines the project requirements but the more figures you have prepared to tranfer, the easier getting started will be.
Monday, March 7th
AIM: When is a drawing complete?
DO NOW: Right now we are working on times life drawings to build our skills in drawing the human figure as well as to help us understand proportion? Today we are going to practice figure drawing with both a model and an image. This process is very different and you will get to decide which you prefer. For the upcoming project you will have to use both techniques so right now I want you to pay attention to the following examples to get an idea of what the expectations for this assignment are.
Today's Activities:
Students will begin with a 5 minute and ten minute warm up one standing and one seated. Students will then begin drawing the person that has been selected from a magazine and they will wok on this for the remainder of the period.
Questions to consider:
What makes a drawing complete?
Friday, March 3st
AIM: How do we use proportion in life drawing?
DO NOW: QUIZZZZZZZZZ!! We went over this yesterday and don't worry, it's exactly the same! In your sketchbook please answer the following questions:
#1 What is the definition of proportion?
**Using the head as a unit of measure, please answer the following questions:
#2 Approximatly how tall is the average human?
#3 How many heads down in the belly button?
#4 How many heads long are the legs and where can you find the knees?
Thursday, March 2st
AIM: How do we use proportion in life drawing?
DO NOW: Before we begin with our gesture drawings I want to expand on yesterdays do now. Before we start our project we each have to demonstrate an understanding of the proportion of the human figure. The next step is combining this knowledge with drawing specific people and being able to draw what we see. This is a step by step process. For the next 5-10 minutes I want you to draw the person you see projected above. Use the head as a unit of measure, but also, try to make your drawing look like the person you see. Look at what they are wearing and how they are standing and try to recreate this to the best of your ability.
Today's Activities:
First we are going to discuss the definition of proportion and what it really means. If the definition of proportion is the relationship of parts to the whole, what does that mean exactly? Let's relate it back to the human head. Draw one really small head and next to it, one that is three times larger. Imagine if you used the opposite heads as units of measure, what would happen??
Class will begin with gesture drawings as a warm up. 10 mins.
We will then look at images of drawings and discuss how to build on the initial sketch. The more time you have to draw, the more detail you should be able to convey.
We will then move onto a 5 minute drawing. Next, a 10 minute. Both teacher and students will serve as the model.
TOMORROW!
Proportion Quiz! The first ten minutes of class we will have a quiz on proportion. There will be 4 questions and then you will have to draw using me as a model, demonstrating accurate proportion using the head as a unit of measure.
Questions:
What is the definition of proportion?
Using the head as a unit of measure, please answer the following questions:
Approximatly how tall is the average human?
How many heads down in the belly button?
How many heads long are the legs and where can you find the knees?
EASY.
Wednesday, March 1st
AIM: How do we use proportion in life drawing?
DO NOW: Before we begin gesture and life drawing I want you to review accurate proportion. REMEMBER, the definition of proportion is the relationship of parts to a whole. Qucily sketch out the human figure from your memory in accurate proportion using the methods we have studied. Tips: Human height on average is 7.5 heads when we are using the head as a unit of measure.
The bellybutton is 3 heads down from the top or two heads down from the next.
The half head should go in the below the belly button.
Legs are 4 heads long, the knees at 2 heads down.
Today's Activities: Gesture drawing followed by 3 minute model drawing.
Tuesday, March 1st
AIM: How does proportion help us draw the human figure?
DO NOW: Take the next ten minutes and draw the man that you see projected above. Try to use what we learned yesterday and draw this man as accuratly as possible. Use the head for a unit of measurement like we learned and when you are done please draw tiny circles where you know the joints are.
Today's Activities:
Now that we have a sense of how proportion works in the human figure let's talk for a minute about the human sketleton and how we are built. For example, what are joints? How do they work and why do we have them? When we are drawing the human figure it is extrememly important to understand where our joints are and how we move because the human body is generally moving and bending. In order to draw different positions we have to understand proportion in order to manipulate it.
Let's practice! Now that you have practiced drawing from pictures and ideas, let's try drawing from life!
Now that you understand proportion, we are going to practice with the different exercises people use to warm up when drawing people. The first exercise we are going to start with is gesture drawing!
What gesture drawing should do is capture the movement of the body in a quick sketch. This should last only a few minutes each time. Let's take a look at some gesture drawings while we talk about them.
Things to consider:
#1 How does understanding proportion help us in a quick gesture drawing?
#2 How does gesture drawing show movement?
#3 How does gesture drawing help us understand anatomy?
Monday, February 28th
AIM: How does proportion relate to the human figure?
DO NOW: Before break we discussed proportion in relation to the human face. Today we are going to expand on this principle and think about how understanding proportion can help us draw the human figure. Before we begin I want you to take a few minutes and try to the human figure as accuratly as you can simply from memory. The figure can be male or female adn you should draw them standing straight, form head to toe. Do not worry about detail, simply attempt to get a proportionally acurate sketch.
Today's Activities:
So far we have discussed two of the principles of design, balance and porportion. Let's take a minute and look at some of your drawings and see how accurate they look!
Now, before we try again, let's start by breaking down the human body and trying to figure out just how proportion in drawing works. Here is a little video I found, it's a bit absurd but I think the visual images are really helpful in understanding the concept.
Now that we lived through that, let's try to do it ourselves together.
Step one - on your paper I want you to draw 8 heads. Draw them lightly so that we can erase as we move along.
Step two - Let's draw the arms outstretched using these heads as units of measure. Make a mark where we know the joints are.
Step three - lets try to draw another leg stretched out to the side and see if it makes sense.
Now - lets thinga bout where the neck, the torso and the joints are. A great way to think about this is by looking at a wodden sculpture that is commonly used for drawing purposes. While I don't have anough of these guys to go around, I do have pictures we can look at for now.


Wednesday, February 16th
AIM: WEDNESDAY! How can we better understand balance and proportion?
DO NOW: You guys have been working hard and doing a great job! For today lets switch gears a bit and spend the next ten minutes trying to draw the human face. You can either draw your own face from memory, the face of a friend, or look to the person closest to you and try to draw their face. I want you to try to make this drawing look as realistic as possible!
Today's ACtivities:
Once this is complete lets go back in time a minute and review one of the principles of design that you learned about in studio. This principle is balace. Do you remember the four type of balance?
They are:
Symmetrical
Assymetrical
Approximate
Radial
Which of these types of balance would you say best describes the human face? Now, take a look at your drawing. Is it in proportion? Why or why not? Does it look balanced? Why or why not?when drawing the human face there are a number of tricks to keep in mind. What I want to do now is go over these tricks together and lets try to draw a basic human face.
Tuesday, February 15th
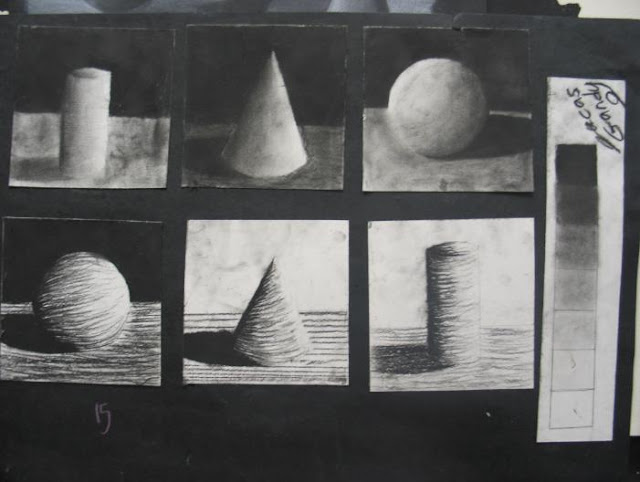
AIM: How do we see value when we are looking at an object?
DO NOW: Everything we see exists because of the light. As artists it is our job to actully consider the properties and characteristics of light and also of SHADOWS. When we were studing contour line we trained our eyes to see and draw the LINES that showed the 3-D shape of the object. Now what we want to do is learn to draw and observe in tone, that is, in light and in shadow. Yesterday we practiced drawing 4 forms and imagining a light source for them. Today I want you to actually look for how the light is hitting the object on your table and once again, to draw what you see. Where is the light coming from? Where does it hit your object? Where are the highlights and where are the shadows?
Take 10 minutes and do the best you can to draw your still life using VALUE. Try to draw the shadows as they appear on the object and REMEMBER -
1. USE THE FULL VALUE SCALE and
2. MAKE SURE YOUR SHADOWS FOLLOW THE SHAPE OF THE OBJECT!
Today's Activities:
We see things differently based on how the light is hitting them. What is important to remember is that on every objects there are shadows and highlights EVERYWHERE. Where you see them is based on 2 things - one, the shape of the object, and two, the light source. Where is the primary source of light coming from in this room? If there were no windows on the opposide side of this room, the light would be even more dramatic. Notice what happens when we turn on the overhead lights. The lighting on the object changes!Let's look at some examples of drawings using different kinds of light sources. You tell me wether the light is dramatic or not.


Now that we have gotten used to line I'm going to try to force you to do this next exercise using no line at all. TRICKY. First, lets look at some images different artists have created using value and talk about how value is working in each one. Remember, a large part of understanding art is being able to look at and talk about art :) Before we start lets watch an example.
Here are some guidelines for this exercise:
Don't use outlines.
The aim of realist value drawing is to show the light and shadow and surface tones, creating a three-dimensional illusion. Outlines only define visible edges and don't tell us anything about light and dark. Linear drawing and value drawing are two different 'systems' of representation. Mixing up the two can be confusing, if realistic drawing is your aim.
Change your approach.
When creating a value drawing, you need to shift out of line-drawing mode, and the best way to do this is to forbid yourself to draw a line, and focus on areas of value. You might use the lightest of lines to get down the basic shapes. From there, build up the shading. Often the 'outline' will be at the join between two different values, and is created by the contrast between the light and dark area.

Monday, February 14th
AIM: What are the different methods we can use when drawing to make things look realistic?
DO NOW: So far we have learned what contour line is and how we can use it to make things look realistic.Today we are going to expand on one of the seven elements that we studied in Studio known as value. For today's do now I want you to make a 5 box value scale using your pencil. Remember, this scale should move fluidly from dark to light, dark being the darkest tone you can get using your pencil and the lightest being the white of your paper.


Today's Activities:
1. Now that you we have completed our value scales, lets try to apply this range to some objects.
The first thing I want to talk about with you today is from the book How to Draw What you See by Rudy De Reyna. Here is a link to the book on amazon with a brief preview of some of the things we are going to look at today. http://www.amazon.com/How-Draw-What-You-See/dp/0823014606#reader_0823014606
What we see here are the four forms that Reyna refers to as the basis for all objects.Today we are going to practice value using these forms.

Friday, February 11th
AIM: What does cross contour line drawing show us about the internal structure of objects? (continued)
DO NOW: Todays one of our writing do now days. We will have these throughout the semester and I will provide feedback and write back to you! Today's topic - THEME - So a theme is essentially an idea. When writing each author has a theme that they are working with and it's often the same for artists. This semester I am going to ask you to work both with themes that I assign as well as with themes that you come up with yourself. Right now I want you to think of your favorite movie, book or song and tell me what it is and what it is about. What is the theme of the story and why do you think it is interesting? Now, very quickly, take 5 minutes and sketch out a movie, book or album cover that could show me what the theme is through images.
Today's Activities:
Finishing up with our cross contour drawings!
Thursday, February 10th
AIM: What does cross contour line drawing show us about the internal structure of objects? (continued)
DO NOW: QUIZ!!!!!!
Today's Activities:
Continue cross contour drawings.
Wednesday, February 9th
AIM: What does cross contour line drawing show us about the internal structure of objects? (continued)
DO NOW: Please take the first five minutes and answer the following questions. You will have a quiz tomorrow in the beginning of class that requires you to answer these same EXACT questions.
1. What is contour line drawing?
2. What is continuous contour line drawing?
3. What is blind contour line drawing?
4. What is cross contour line drawing?
5. Why is it extremely important to look more at the object you are drawing than at your paper?
Today's Activities:
Please continue working on the cross contour drawings on tracing paper that you began yesterday.
Tuesday, February 8th
AIM: What does cross contour line drawing show us about the internal structure of objects?
DO NOW: Now that we understand what a contour line is, lets take it a step further. We have already talked about how contour lines are more that just the outline of an object but ALSO the lines that show the shape inside as well. Let's take 10 minutes and see if we can figure out how to apply that to our still life today. First, take a look at the example below. What do you notice about the contour lines here?

Now, before you start drawing lets break this down into steps.
Step 1 - draw the outline first of what you see in front of you. Once you are done you should have the 2-dimensional shape on your paper.
Step 2- Now, inside of each shape begin to draw the INTERNAL CONTOUR LINES. Is the shape round? Square? A cylinder? Try to draw your contour lines so that they indicate the VOLUME of the form.
Today's Activities:
Today's do now might be a bit difficult. In order to break this concept down further we are going to use tracing paper to find the contours of the human face.
First - trace the outline of the face.
Second - trace the internal contour lines that you see, including hair, hats or any clothing.
Third - Take your tracing paper off of the picture.
Now we are going to fill this page with the cross contour lines that are harder to visualize when looking at a face or an object. Before we begin lets look at some examples.


Monday, February 7th
AIM: What can blind contour drawing teach us about seeing? (continued)
DO NOW: On Friday we practiced BLIND CONTOUR and CONTINUOUS CONTOUR drawing with our hands.
Before we begin, try to answer the following question:
What do you think? Is this an example of continuous contour or blind contour drawing? Please explain why you think it is the one you chose.

Now, lets pick up where we left off on Friday and begin with a blind contour drawing of the object on your table. Remember, please draw as slow as you possibly can and DO NOT LOOK AT YOUR PAPER! The fun part is seeing how strange your drawing comes out when you are looking ONLY at what you are trying to draw!
Today's Activities:
After the do now students should compare and contrast the drawings that they have made.
Questions for discussion: Do any of the drawings look like the object? If so, what part?
Now, lets try drawing the object again, only this time you are allowed to look at your paper. Please keep the following in mind:
When you look at an object, the shapes you see vary depending on your point of view. When you are drawing an object, you need to select a viewpoint and stick to it. This means setting the object down, and sitting so that you can look from your object to your paper with minimal movement. You want to always have your head in the same place whenever you look at the object. In this way, the shapes will always look the same. A small movement can make a surprisingly big difference once you start drawing details.
Once we are finished lets compare the two drawings. What are the simularitites and what are the differences? Do you think that doing the blind contour drawing first helped you understand what the object really looks like?
LAST EXERCISE! Ok - now I'm going to add on to your object and set a still life up on your table. I want you to draw a contour line drawing of this still life. This exercise should take a minimum of 15 minutes. Please try to remember that even simple line drawings can be detialed and complex. Let's look at a few examples.


Friday, February 4th
IT'S FRIDAY!!
AIM:What can blind contour drawing teach us about seeing?
DO NOW: Yesterday we learned what contour line drawing is and practicied by drawing an apple. Today I want you to revisit this concept by drawing the SAME apple ONE more time. This time however, DO NOT pick your pencil up off the paper, even for a second!
Today's Activities:
First I want you to take the next 7 minutes and watch this video related to contour line drawing. Pay attention to the way contour lines are described and look for the artists introduction to BLIND CONTOUR DRAWING. This is what we will be experimenting with next.
Okay. Enough talking and onto drawing.
What we are going to focus on today is BLIND and CONTINUOUS CONTOUR DRAWINGS of our hands. Lets take a look at an example.

ATTEMPT #1 For this one we will do a CONTINUOUS CONTOUR drawing, just like you did with your apple for the do now.
What to Do: First, scrunch up your hand like in the image above. THEN - just draw your hand! Place the pencil near the bottom of the page, then looking at the edge of the wrist, begin to follow the line, going very slowly and steadily. Try to make your pencil follow every slight curve and bump. When you get to a crease, follow it in then back out to the side and carry on. Don't rush. Concentrate on observing every little detail.
NEXT! Now, were going to do this again, only this time. Without looking. At all. Not even once. First, watch me.
Thursday, February 3rd
AIM: What is contour line drawing and how can understanding what it is help us draw?
DO NOW: Watch this 2 minute you tube video entitled an introduction to contour drawing
Based on what you have seen in this video try to answer the following questions:
What is the definition of contour? Click here for the answer
What is contour line drawing? Click here for the answer
Today' Activities:
Let's recap: Think of contour drawing as drawing the edges of the subject. It’s the outline of what you’re drawing, as well as the internal edges. By drawing the edges you’ll start to see the three-dimensional form of the subject.
Let's Practice - In front of each of you should be an apple. Now if you are reading this at home click on this video and follow along with Dave. Drawing with Dave!
Exercises before beginning -
line quality
line weight
Here are some tips for creating this contour drawing:
- Don’t get too worried about drawing perfectly, as that comes with time.
- Keep your eyes mostly on the apple, and not so much on your paper.
- Don’t invent, avoid meaningless lines, and try to draw accurately only the lines that run along edges.
- Use long bold lines, rather than short indecisive lines, try to keep your pencil in contact with the paper as much as possible.
- Avoid too many corrections, like erasing, or redrawing lines. I know it’s tempting.
- Try capturing a bit of the whole before you get into all the detail, which is an effective strategy here.
- DRAW SLOW - concentrate on the STILL LIFE.
- DRAW BIG!
Let's start with a simple contour outline. GO.
When practicing specific skills in drawing it is important that we draw things over and over and over again. This may seem tedious but in the end you will see the payoff. Before we start howeve, lets take a minute and figure out what the shape of an apple really looks like. In other words - what are the contours that exist WITHIN the apple itself.


These drawing are done using cross contour lines. These are lines that wrap around the whole object showing the shape of each curve.
Before we start our next drawing let's look at some examples of contour line drawing by different artists. What are some of the things you notice about the line quality of these pieces?
NOW - based on what you have seen, draw the apple in front of you again. This time I want you to look for all the contour lines that exist inside the apple as well. Look at these two images as examples.


Wednesday, February 2nd
AIM: Why do we have a sketchbook and how do we use it?
DO NOW: On the sheet of paper in front of you, please draw a tree from memory. After you have finished I want you to follow the next few steps.
#1 -The theme for this sketch is isolation. Find a way as you are following the next fwe steps to make your drawing convey a sense of isolation.
#2 - draw an object on, behind or next to your tree.
#3 - Draw an animal or insect near your tree.
#4 - If you have not done this already, add value to some or all of the elements of your drawing in order to make them appear 3 dimensional.
Today' ActivitiesQuestions for discussion:
1. When is a drawing finished?
2. What methods did you use to convey a sense of isolation?
3. What do we assocate visually with isolation?
A large part of understanding art is learning how to think visually. How do we let someone know how we are feeling through imagery? How do we convey our emotions / thoughts and ideas through imagery? What I want you to do today is think about the steps you took in making this quick sketch. Ask yourself why you made the decisions you made? Everything in art we do for a reason.
Even the small sketches that you do in your sketchbook should be complex and well thought out. You should use your sketchbook to brainstorm and to experiment with different thoughts and ideas.
Let's take a minute and look at the work of Kassandra DeJesus, as artist who went to this very school and graduated last year. Her sketchbooks will give you a much better idea of what a sketchbook should look like and what it should contain.
In the end your sketchbook itself shoudl be a work of art.
Tuesday, February 1st
AIM: What should we expect out of this course?
DO NOW: In a moment I will hand out a sheet of paper. On this front of this card please write your:
NAME and E-MAIL
PARENTS NAMES, E-MAILS and PHONE NUMBERS.
On the same side of this paper please take a minute and write down what your previous experience with art has been. How many years or semesters have you taken and who your previous teacher(s) were. Next, please answer the following questions:
How do you feel about art?
Do think you have any artistic talent?
Do you enjoy looking at art? Why or why not?
Do you enjoy making art? Why or why not?
Do you enjoy talking about art? Why or why not?
STEP 2
On the back of this paper please take a moment and draw the bottle that you see on your table. In this drawing I want you to use ONLY line. Make sure to include as much detail as possible, including the dripping wax etc. PLEASE make sure to draw the botle you see on YOUR table. Each bottle is different, how do you show the difference when drawing?
Today's Activities:
Today we will go over the syllabus, rules, procedures and protocols for this class.
We will discuss the goals and aims for the semester and make sure that each one of you has a solid understanding of what will be expected of you and what we will be covering in class.